DEWBOT VI Electrical
While the motors and pneumatics are the muscles of the robot, the wiring is the central nervous system. Electrical wiring supplies power from the battery to the Power Distribution Board, from there to the Jaguar and Victor speed controllers and then on to the motors. Wires also take signals from the sensors to the either the Digital Side Car (for on/off signals) or to the Analog daughter board (position sensors) for processing by the cRio. This page covers the details of the Electrical system, please see [DEWBOT VI Electrical Team] for the build season notes.
Contents
DEWBOT VI Technical Information
There are a lot of details about the electrical system, to make it easy to understand we break the system in to multiple parts: Power, digital in, digital out, analog in, solenoids, and other.
Power
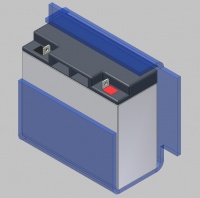
Power is supplied by a 12 volt, sealed lead-acid battery. It sits in a Tuffak box that is closed by a length of 2" Velcro that runs around the battery and box. This means the battery will not come out of the robot even if it's upside down. The Tuffak parts are shown in the drawing in blue.
Power is routed via two Anderson high amperage disconnects through a 120 volt circuit breaker to the Power Distribution Panel. The panel is supplied by FIRST and holds all of the breakers. Depending on the device we use 40, 30 and 20 amp breakers in the panel. #6 wire is used for all the main battery connections.
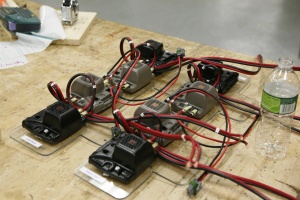
We use three different sizes of wire depending on the device. Large, #10 wire is used to connect all of the Jaguar motor controls. Each pivot has two motors, drive and steering. There is a Jaguar for each motor. The large wire has very little resistance and can carry the high current loads of the motors.
Connections to each Jaguar, both power and motor sides, uses a ring connector. The holding screw needs to fall completely out before the wire will disconnect.
Power to the compressor (via a spike) and the Fisher Price Motor uses #12 wire. Once again the larger than needed wire has lower resistance. #12 wire was used because the terminals on the Spike, Victor Speed Control and the Fisher Price fast-on connectors will not accommodate a larger wire size.
Other devices such as the cRio, cRio daughter cards, digital side car, camera, wireless access point, etc. are wired with #14 wire.
Digital In Circuits
There are four digital in circuits. These are On-Off devices that are used for status.
- Air Pressure Switch - this switch closes when the air pressure is less than 80 PSI and opens when the pressure reaches 120 PSI. It is used, via some programming to control a Spike (high current relay) that controls the compressor
- Kicker extended - this switch closes when the kicker is in the armed position (extended). It is used to signal the programming that the kicker trigger latch can be enabled.
- Autonomous field selector - this is a three position switch that is used to determine which section of the field we are on (far, mid, near). This switch uses two digital ports.
The switches are wired with #20 wire. In all cases the switch grounds the signal line (assert LOW) since the digital side car has pull up resistors on the inputs.
Digital Out Circuits
There are two styles of digital output circuits that we use, Pulse Width Modulation (PWM) and Relay. The single relay output goes to the Spike that controls the air compressor. There are nine PWM ports, one for each of the pivots motors (8 total) and the Fisher Price motor that runs the possessor.
The PWM cables are three wire standard servo wires. We are able to buy these premade in various lengths.
Analog In Circuits
There are two Analog units in the cRio. The first unit is connected to:
- Battery voltage - this reports battery status back to the driver station
- A short range Sharp GP2D120 IR sensor and a long rangeSharp GP2Y0A02 IR sensor. These are mounted on the front of the robot and are used to sense the position of the ball.
- Two VEX line follower units. These are mounted on the bottom of the compressor and are used to keep from going over the center line.
- Electronic compass from the Glossary#KOP Kit of Parts
The second analog unit is connected to drive controls:
- Each pivot drive has a [http://www.mouser.com/ProductDetail/Cherry-Electrical/CU103602/?qs=9h%2FNf6AMfAIQwnag%2F2iWNw%3D%3D |Cherry Magnetic Sensor that is used to determine the rotational position.
- There are four 5K potentiometers that are used for fine grain alignment adjustment of the pivots. These are used to compensate for changes in the drive train due to gear and chain wear, etc.
Connections from the daughter cards to the sensors use PWM cables (described above). By using a similar part we cut down the need to carry a wide variety of spares.
Solenoids
Two solenoids are used on the robot, one to extend and arm the kicker and the second to latch / fire the kicker. The solenoids are 12 volt ones from the 2009 KOP and are wired using the cables supplied in the 2010 KOP.
Other devices
The Spike for the compressor has a circuit breaker in it. Because this unit does not need to be accessed it is located under the cRio on the back panel.
The safety light is mounted on the frame. It is wired directly to the digital side car using #20 wire.
Ethernet Connections
There is a short Ethernet connection from the cRio to the wireless access point. The access point is mounted on top of the cRio. It's held in place with wide Velcro. The rear edge slides under the rear frame to keep it from bouncing out
There is a crossover cable (yellow) that goes from the cRio to the camera. The camera system is used for target tracking.
Device Mounting
There are five major electrical mounting panels made of Tuffak on the robot. They are mounted on:
- Left and right side walls - each contains the Jaguars for that sides pivots (shown)
- Left floor - contains the solenoids for the pneumatics
- Right floor - holds the digital side car and the Victor for the possessor
- Rear - holds the cRio and two spikes, one for the compressor and a spare.
Tuffak is used to insulate all the electronics from the frame (and ground). The panels can be removed from the robot for maintenance.
The Power Distribution Board is mounted directly on the frame with nylon spacers.
Documentation
Wiring information as of 21 Feb. Document contains pictorial view of the wiring, circuit numbers and the amp rating for the breakers.
Digital Side Car Reminder
This is a reminder that the digial sidecar has pull up resistors on all the Digital IO ports. This means that all the pins report a TRUE even when there is nothing connected. All switches need to be set up to pull the signal low. Wires run from ground through the switch to signal.
Battery Care and Handling
Lead-Acid batteries (like the ones used by FRC) do not like deep discharge (10.5 Volts is deep discharge). This causes the chemistry in the battery to "wear out", leaving the battery weaker and eventually unable to take a charge. So, change your batteries often, don't stress them so much.
They also very much do not like staying even a little discharged for any length of time. A week at 50% discharge will cause measurable damage. So, recharge the batteries immediately after every use. (An unused battery can sit 2 to 3 months without any care, but at that point it MUST be charged up again, or it will be damaged).
Of course, handling them carefully:
- Lift by the case, never ever by the terminals or attached wires (their ears)
- Don't drop them - treat the case like it was fragile - it is
Make sure the wires stay firmly attached - a loose connection will suck down all the power (turning it to useless heat) making the robot seem to eat batteries fast.
Chief Delphi Battery Post There is a long quote and some additional information after the quote. We do test our battery sets before competitions and we do the battery rotation pattern suggested. We only take 5 batteries with us, and we've not had a reason to use more than four.
Engineering Information
Motors
- RS555vc Motor Specifications 12 V, 4 500 rev/min free, 0.11 N·m stall, 4.40 A stall, 0.19 A free => 13.29 W max. at 12 V.
- RS555sh Motor Specifications
Sensors
- Cherry Part CU103602, rotational sensors - used on each pivot to tell what direction it's pointing.
PSOC
- PSOC carrier board pin outs This is the board made by e-Stop Electronics to make it easier to make connections.
Electrical
- 2010 FIRST electronics documentation
- Jaguar Information What the lights mean on the Jaguar

