DEWBOT XVIII Drive-Train


So this year, for the first time ever, team Sab-BOT-age had to go through a make-versus-buy analysis. Using a COTS swerve module provides some very compelling benefits:
- COTS may be purchased ahead of the start of Build Season; and
- COTS may be reused.
Balanced against this:
- Some teams using COTS swerves in 2022 experienced supply-chain delays with spare parts (we can manufacture our spare parts);
- Designing & building the swerve modules provide a great education for our students;
- 1640's swerve is very light-weight (4.8 lb); and
- We are very comfortable with our swerve's performance.
The result of our make-versus-buy analysis was the decision to build our own modules again in 2023. But we'll go through this analysis again next fall.
Sab-BOT-age's 2023 swerve design was developed from the post- Hatboro 2022 design. Improvements focused on ease-of-manufacture, ease-of-service, and survivability.
Key 2023 changes were:
- 4" VexPro Traction Wheels (217-2588) replaced the 4" 80A durometer AndyMary HiGrip wheels (am-2256) we had used since 2013. The HiGrips perform well, are economical and they're light, but they wear out and replacements require a lot of machining before they can be used. The VexPro Traction wheels are used as-is and we employ a replaceable tread (which 1640 prints to a HiGrip tread pattern using Priline shure 95A TPU Urethane). The new wheels and treads were tested at Ramp Riot and found reliable with acceptable wear rates.
- Replaced the BI Technologies Magnepot Hall Effect Potentiometer Part # 6127V1A360L.5FS with Calt encoder. The Calt encoder is a Hall Effect device with double ball bearings (the BI has a bushing) and 12 bit resolution (vs the BI's 10 bit). Equal cost. 1640 had used the BI Potentiometer since 2012 DEWBOT VIII.
- Replaced COTS 1st stage drive reduction gears (15T & 29T steel 20DP spur gears) with gears cut from gear stock and broached in-house. This change allowed more rational and better-fitting bores in these gears and represents a significant time and cost savings.
- polycarbonate top plate - We changed supplier to obtain a full .250 thk polycarbonate for better stiffness.
- Replaced a COTS 11T HTD5 timing belt pulley with 1-piece printed Pulley & Gear. The old pulley had been prone to failure and was no longer readily available. The 11T pulley allows 1640 to use NEO 550 motors for steering control with only two stages of reduction (6T to 48T 20DP gears; 11T to 60T HTD5 for 43.6:1 reduction). NinjaTek Armadillo (75D) TPU (Polyurethane) filament was used to print this Pulley-Gear combo.
- Epoxy vacuum-infused carbon fiber forks replaced PETG printed forks. More on this below.
Specifications
Drive Motor - NEO Drive Reduction - 7.73:1 in two stages (29T:15T Steel Spur Gears - 60T:15T Steel Bevel Gears) Wheel Diameter - 4.25 in
Steering Motor - NEO 550 Steering Reduction: 43.6:1 in two stages (48T:6T Spur Gears - 60T:11T HTD5 Pulleys & Belt)
Mass: 4.8 lbm
Epoxy Vacuum-Infused Carbon Fiber Forks
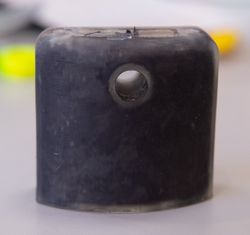
This started as an off-season project to manufacture forged carbon fiber Forks for our swerve modules. Forging proved to be prohibitively difficult due to the issue of mold production and the reality of a High School student work force.
But another approach was developed which succeeded.
- Resin print molds w/ 1.5mm wall thickness (thinner walls will not withstand vacuum)
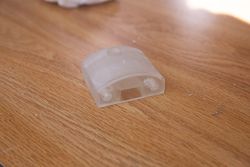
- Tap screw holes in mold
- Screw pre-waxed (mold-released) screws into the mold
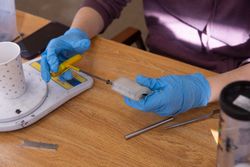
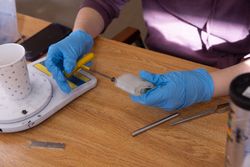
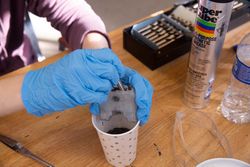
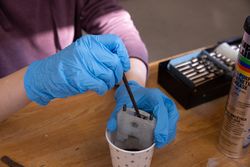
- Load pre-weighed carbon fiber into the mold
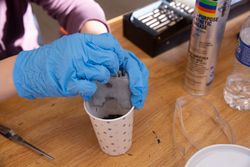
- Tamp carbon fiber into the mold
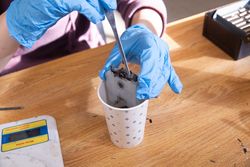
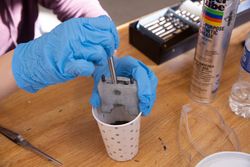
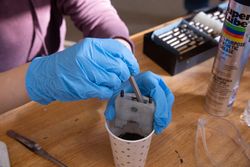
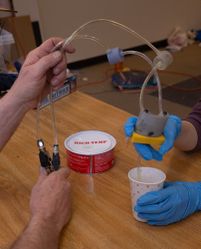
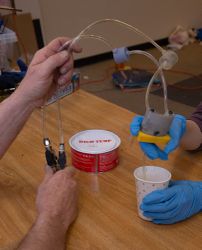
- Infuse epoxy into the carbon-fiber filled mold via vacuum draw
- Cure epoxy in warm environment
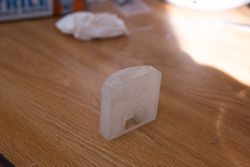
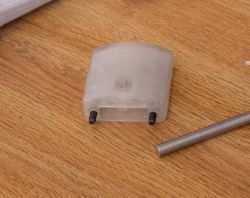
Resin Mold
Resin Mold
Resin Mold
Screwing mold-released screws into the mold
Mold with screws inserted
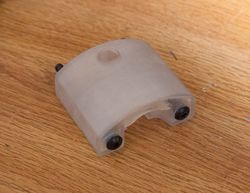
Mold with screws inserted

Load pre-weighed carbon fiber into the mold
Tamp carbon fiber into the mold
Infuse epoxy into the carbon-fiber filled mold via vacuum draw
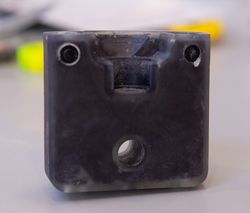
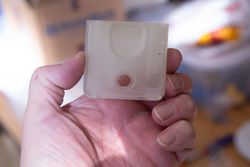
Finished Carbon Fiber/Epoxy Swerve Fork
Finished Carbon Fiber/Epoxy Swerve Fork


